Palettes
A palette is a color map that displays feature information in a meaningful way. By using palettes correctly, flaws or other elements in a feature can be highlighted.
Palettes can be changed and stored via the Palette Form.
What is a Palette?
A palette is a set of 256 color values that can be applied to the data in an image. The colors can be manipulated to highlight different features of your scanned data. The original data values are not changed.
How Palettes are applied to Images
Palettes are mapped to image data based on 1) the possible range of the data, and 2) the number of reserved colors used for other features.
Peak Amplitude Images
For signed Peak amplitude images, the minimum negative value is assigned to the lowest palette value, and the maximum positive value is assigned to the highest palette value. For example, for an 8-bit signed image, -128 would map to palette entry 0, and 127 would map to palette entry 255.
TOF/Thickness Images
For Time of Flight images, the lowest palette value is applied to the maximum TOF value, i.e. the value farthest from the surface. The highest palette value is applied to the mimimum TOF value, i.e. the value nearest to the surface.
The Palette Form
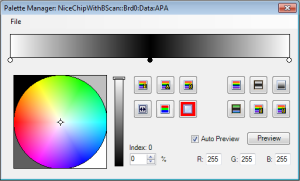
The palette form allows the user to alter the displayed colors of an image, in order to highlight specific details or enhance contrast. The palette is opened from the Image Form menu bar.
Palette Form Controls
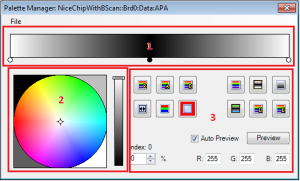
A palette form will control the color settings for a single Collection. Separate collections use separate palette forms.
The Palette window has three main sections:
- A Color Bar at top that shows the full range of the palette. The palette is applied to the 8-bit image display, and therefore has 256 separate colors.
- A Color Wheel and Intensity Slider that allows the user to change individual colors along the color bar. The selected hinge point color is changed when the color wheel value changes.
- Buttons and Controls for applying preset palettes.
The controls consist of:
 |
|
 |
|
|
|
|
|
|
|
|
|
|
|
|
|
Hinge Points
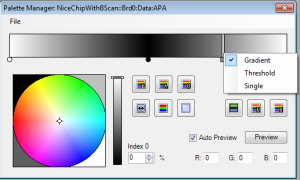
A user adds colors to the palette by adding Hinge points. By default, there are two or three hinge points (depending on the data type, see Signed vs. Unsigned Palettes) that are at fixed positions. These are marked by the small circles underneath the point. The color of these hinges can be changed, but they cannot be moved.
Click with the right mouse button anywhere on the Color Bar to add a hinge point. The hinge point will have the same color as the location it clicked. By moving the cursor on the color wheel and/or dragging on the Insensity Bar (again using the left mouse button), the color of the selected hinge point changes. The user may also enter RGB values directly by typing them into text boxes labeled “R”, “G”, and “B”.
User-added hinge points are marked with a small square, and can be moved along the color bar to any position by using the left mouse button. The user can also move a hinge to a position based on % using the up-down control to the left of the RGB values. To delete a user-added hinge point, make sure it is selected, then press the “Delete” button.
Hinge Point Modes
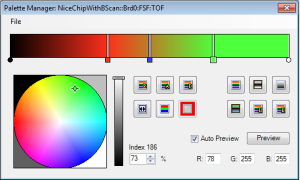
By default, when a new hinge point is added, its color is interpolated between the hinge points on either side of the selected hinge in order to make a gradient. A hinge point can also be set to Threshold mode (where the color will remain the same until the next hinge point) or Single mode (where only the color at the hinge point is changed). To change the type of the hinge, right-click on the selected hinge point. This will bring up a small menu (at right) that will allow the user to select the hinge point type.
Setting Threshold Mode
To change the hinges so that they are all set to Threshold, click on the "Threshold" button. This sets all hinges (except for Singles) to Threshold mode.
To change back to Gradient mode, click the threshold button again: all hinges (except for Singles) will be set back to Gradient mode.
Note: if you have a combination of Threshold and Gradient hinge points, pressing the Threshold button will convert them all to Threshold.
Reversing Hinge Point Order
The order of the hinges can be reversed using the "Flip" button. All user hinge points are affected. The locked points at the left and right switch colors.
Signed vs. Unsigned Palettes
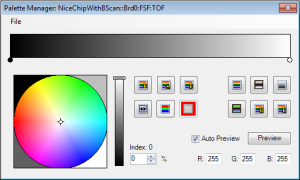
A palette is considered “Signed” if it has a locked hinge at the center of the palette region. Signed palettes should be used on data with distinct positive and negative results (e.g. Peak amplitude images, B-Scans). “Unsigned” data does not have such sharp distinctions (e.g. TOF, Frequency, Thickness).
| Signed vs. Unsigned Palettes | |
|---|---|
| Signed | Unsigned |
| Three locked hinges (left, center, right) | Two locked hinges (left, right) |
| Mirror button enabled | Mirror button disabled |
| Flip will reversed the order of hinge points on each "side" of the palette independently | Flip reverses the order of the whole palette |
| Thresholds draw from right to left if the hinge point is < 0 | thresholds are drawn from left to right always |
| Index range is -128 to 127 (-100 to 100% FSH) | index range is 0 to 255 |
| Time-Based palettes disabled | Time-Based palettes enabled |
Mirroring of Palettes
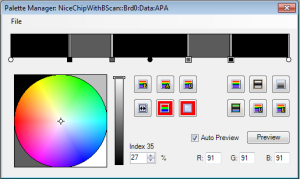

If a palette is signed, the positive an negative sides of the palette can be set to the same colors, thus resulting in a consistent view of the image data. By default, mirroring is turned on when manipulating a signed palette.
When mirroring, changes to a hinge point or the addition or removal of a hinge point will immediately reflect on the opposite "side" of the palette. Thus, if a hinge is added to the negative "side", that hinge will automatically be added to the "positive" side as well
If the user wishes to have independent colors on the positive and negative side, turn off mirroring.
Time-Based Palettes

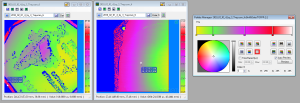
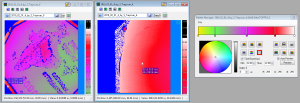
Time-based palettes are color ranges that are based on absolute time, rather than the amplitude of the data. In this way, multiple TOF images can be displayed with colors representing the same period of time.
Note:Time-based palettes only apply to TOF and Thickness images.
To create a time-based palette, create an unsigned palette and click on the "Time-Based" checkbox. Two fields allow the user to enter the minimum and maximum time (in microseconds) that the palette will cover.
When using time-based palettes, the user specifies a time range to use (e.g 10-20 us). When the palette is mapped to the TOF image, it will color any data within the appropriate time range. Data outside the time range will be rendered black.
In the examples at the right, we can see the affect of this palette mode. In image (a), a point of interest on each image is specified. Both are the same time value, but show as different colors as the raw data is a different value. When using the time-based palette, in (b), both images show the same colors at the same points in time. Note the black regions at the top of both image color bars: this represents data within the image that is not within the palette time range.
Special Color Considerations
Some images (such as Relative Threshold Gate phase inversion results or Void results) reserve certain colors to highlight important data. These colors will not be affected by palette changes, but using similar colors on the image may obscure other results. The following table shows the default reserved colors based on the image type. The reserved colors can be changed in the Configuration dialog.
| Image Type | Reserved Colors (default) | Meaning |
|---|---|---|
| Peak Amplitude (all types) | Red | Cluster indications (for Cluster Analysis) |
| TOF/Thickness | Blue,Green, Yellow | Minimum TOF, Maximum TOF, No Data |
| RTG | Red, Yellow | High and Low Phase Inversion |
| Void | Blue | Void indications |
Saving and Loading Palettes
A palette file is saved with a ".pal.xml" extension. It contains the hinges, colors, and positions needed to recreate the palette.
Scan Collections
When a scan collection is saved, a palette is associated with each feature. If no changes were made, this is the default palette for the feature type. The next time the scan collection is loaded and an image of a feature displayed, the palette used for the image will be restored.
See also: Saving a Collection.
Independent Palette Files
If the user wishes to save a palette to another location, the File menu of the Palette Form will allow the user to save the file. By default, independent palettes are saved in the “Dir_Palette” directory as defined in the *.exe.config file.
Quick Button Palette Files
Some palette names found in the Palette directory are associated with the Quick Buttons on the Palette form, these are:
- gray.pal.xml
- blacktowhite.pal.xml
- rainbow.pal.xml
- bscan.pal.xml
- user1.pal.xml
- user2.pal.xml
Overwriting these files will permanently change the palette associated with the quick buttons. Proceed with caution.
Setting Palette Defaults
By clicking on the “Set as Default” button, the current palette will be made the default palette for all future images of the selected feature (Peak, TOF, etc.). When defaults are saved, special “Default” palette files are created in the Palette directory. Removing the file will reset the defaults back to system settings.
See Also: Gate Features
The default palette filenames are:
| Default Palette File Name | Types of Images Affected |
|---|---|
| default.pal.xml | Any feature without a default palette |
| default.peak.pal.xml | 8 and 16-bit peak images (APA,NPA, etc) |
| default.tof.pal.xml | TOF and Thickness images |
| default.rtg.pal.xml | Relative Threshold Gate Peak and RTG images |
| default.enc.pal.xml | Scalar Encoder images (not often used) |
| default.freq.pal.xml | Frequency scans (Peak Frequency, Center Frequency, etc.) |
| default.upeak.pal.xml | 8 and 16-bit Unsigned Peak images |
| default.afreq.pal.xml | Frequency Amplitude Scans |
As with the Quick Button palettes, changing these file by overwriting will permanently change the palettes used for future scan collections. Proceed with caution.
Reset Palette to Default
By pressing the "Reset" button, the user may return the selected image to the default palette for the image type (see Setting Palette Defaults above).
Using Palettes
By adjusting the palette, the user can enhance contrast, hide some features while exposing others, and perform many other analysis tasks. A properly configured palette can greatly aid in image analysis.
Threshold Map
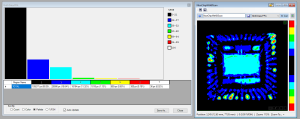 |
The Threshold Counter uses the color coding from the palette to do an extremely fast count of each threshold in the image, and then generates a Threshold Map for the user. In this way, data within certain ranges can be tested (similar but not identical to Cluster Analysis).
PCM Delamination Detection
When detecting Delamnation using the PCM method, a special palette is used to define the delaminated regions.
Sliding Region
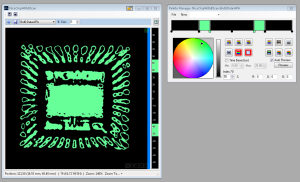 | 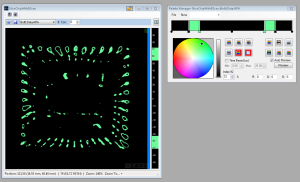 |
by clicking and dragging between two thresholds, a gradient can be "slid" over the range of data in an image. This will highlight data at specific peaks or depths.


